Come grow with me as a quilter this spring!
We'll wander through a garden of fabrics as we stitch together this mysterious pattern.
Watch your skills and techniques blossom on this quilting journey.
Let's unveil this mystery together!
As we continue to grow,
our buds begin to bloom some delicate diamond peonies!
Below is all the information you need to prepare and cut your fabric before
joining me on our YouTube Channel for step by step instructions.
(Make sure you read through all of the instructions before you begin!)
I will be using the Secret Garden Bundle + 2½ yards of A-292-L
in all my pictures to show you the step by step.
But do not worry if you are not using this bundle, I would love to still inspire you every week by sharing multiple color options for the fun and simple blocks.
You can use those color options as inspiration for placement of your fabrics.

For Week 4, you will need:
(These notions are just my recommendations)
• Fabrics (2 medium/dark pieces) and 1 light background
• Sew Daisy Fabric Markers (Use fabric markers to stay organized)
• Creative Gird Rulers: 4½" x 12½" and 6½" square
• Olfa Rotary and Blades
Edyta’s Tip: Always have a stash of fresh blades for your rotary and remember to change them often for the cleanest cuts.
• Sewline Fabric Pencil, Best Press, Pins, Scissors, and fresh Microtex Needles 70/10
Check out our Spring Mystery Quilt Sewing Basket on the website for all your quilting needs!
Your flower will blossom into a diamond Peonies today!
Block 4
9" x 12 ½" unfinished
We will be making 4 total Peony Block 4s.
Cutting Directions:
Cutting directions for 4 blocks:
• Medium Fabric: 4 - 2 ¼" x 21 ½" strips
• Dark Fabric: 4 – 2 ¼" x 21 ½" strips
• Light Background Fabric: 8 – light HSTs cut from 4 squares 5-7/8″
16 – light HSTs cut from 8 squares 4-3/8″
Block Assembly

Arrange 1 Medium and 1 Dark strip to create a strip set.
We will be making 4 strip sets total.
Note: If your strips are not long enough to get all of your cuts from in the next steps, please just make 1 extra strip set.

Sew strips to create a strip set.
Align the 45˚ line on the ruler with the strip set edge and trim a 45˚ angle on the left side of the strip set.

Align the 2 ¼" line with this cut edge and the 45˚ line on the ruler on
one of the seams to cut the sections.

Cut 6 sections from each strip set for a total of 24, for four blocks.
Watch the Week 4 Video for more details.
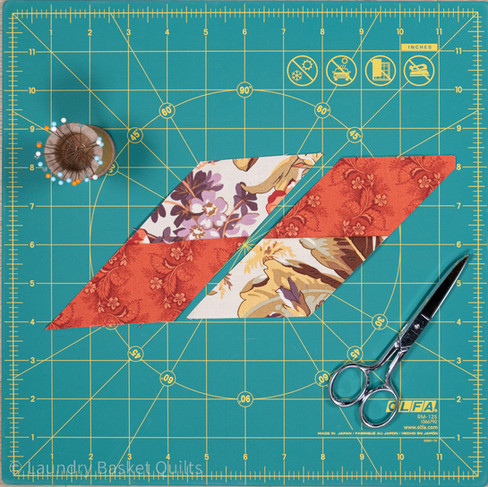
For 1 Diamond Unit you will need 2 sections. Arrange them and sew them as shown above.
Make 12 Diamond Units.
Block Assembly
Select three Diamonds Units for one block.
Arrange one Diamond Unit and two 4 3/8" to HST as shown above.
Sew and press. Make 1 Diamond Units.
Watch our video for detailed instructions.

Arrange remaining two 4 3/8" HSTs and two 5 7/8" HSTs with two Diamond units as shown above.
Pin and sew.

Finish by sewing all units together.
Press and trim if needed.
Repeat steps for a total of 4 Peonies blocks, 9" x 12 ½" unfinished.
Watch our YouTube Channel for step-by-step instructions.
Congratulations, your Peony blocks are in full bloom!
Wasn't that fun and easy? I'm so proud of you.
Our garden is continuing to grow!
INSPIRING COLOR OPTIONS
These are just a few of our fabric options- I can't wait to see what you create!
Happy Quilting!
Edyta
Please remember to share your progress photos to Instagram and Facebook!
Tag us @laundrybasketquilts and #springmystery2023


EPTU Machine ETPU Moulding…
EPTU Machine ETPU Moulding…
EPTU Machine ETPU Moulding…
EPTU Machine ETPU Moulding…
EPTU Machine ETPU Moulding…
EPS Machine EPS Block…
EPS Machine EPS Block…
EPS Machine EPS Block…
AEON MINING AEON MINING
AEON MINING AEON MINING
KSD Miner KSD Miner
KSD Miner KSD Miner
BCH Miner BCH Miner
BCH Miner BCH Miner
I had to keep adjusting my seam allowance width because the first block came out small. The next one came out too big, but by the time I got to the fourth one I got it just right,,,challenging for sure, but I like doing something new. Thank you Edyta
Well, my stitch ripper and I have become good friends!! Not! This is a bit of a challenge! My momma Mia (mom) has passed away now 5 years now, but I can hear her kind words “Irene, you can do this, you’ll finish it, you always do” thank you momma Mia and thank you Edyta. Happy quilting to you al, thanks again, Irene from Canada
Help!!! What is the trick for the Diamond. Once I see mine with seams matching and open it, the points don’t match up.
Shouldn’t the cutting instructions be 4 2 1/4 x 12 1/2” strips? Not 10 2 1/4 X 21 1/2” strips. Very confusing!